Unfortunately it’s been a while since last writing a new Blog post. I wanted something easy to write and build up the motivation. I decided to write a series about one of my favorite protocols and open-source projects:
WireGuard + OpenWrt = ❤️
I assume you already know OpenWrt, WireGuard and Mullvad VPN and have basic knowledge in networking and tinkering with routers.
I have been using OpenWrt since 2014. The rich features and the feeling of being independent from closed-source shady stock firmware, it’s just amazing.
If your Router runs stock firmware, you’re doing something wrong, buddy. You should check out OpenWrt Support devices to find out if your router supports OpenWrt.
Benefits of OpenWrt
- Open-source and linux based Firmware
- No Backdoors or unpatched vulnerabilities because the Manufacturer is out of business
- Better security through regular updates
- Supports advanced networking features like VLANs, Mesh, VPN, Ad-blocking, Encrypted DNS, etc
- User-friendly GUI (LuCI)
- Inexpensive Hardware (My Router(s) costs around 30-40$)
- Large community support
Benefits of WireGuard
“Can I just once again state my love for it and hope it gets merged soon? Maybe the code isn’t perfect, but I’ve skimmed it, and compared to the horrors that are OpenVPN and IPSec, it’s a work of art.”1 —Linus Torvalds
- Modern and fast VPN protocol
- Strong security and state-of-the-art cryptography (Curve25519, ChaCha20+Poly1305 and more)
- Cross-platform (Linux, Windows, macOS, BSD, Android and iOS)
- Minimal configuration compared to traditional VPNs
- High performance with lower latency and Built-in Roaming
- Quick connection establishment and automatic reconnections during network changes. (Try that with OpenVPN 🙄)
Why Mullvad VPN
Mullvad VPN AB is owned by parent company Amagicom AB. The name Amagicom is derived from the Sumerian word ama-gi – the oldest word for “freedom” or, literally, “back to mother” in the context of slavery – and the abbreviation for communication. Amagicom stands for “free communication”.
What should I say, I just love Mullvad VPN.
- Anonymous Accounts (Not even an Email required)
- No-Logging Policy2 (Many Providers just promise it)
- RAM-Only VPN Infrastructure3
- No paid reviews
- Independet Security Audits4
- Team of Nerds, Geeks and Hackers
You can pay in Cash, Voucher or Cryptocurrencies like Monero, Bitcoin, Bitcoin Cash and Bitcoin Lightning (I highly recommend to pay with Monero).
Even though I would NOT suggest it but Credit Card, PayPal and Bank Wire is also possible.
Prerequisite
A couple of things are required to run WireGuard and Mullvad VPN on your Router:
- Mullvad VPN Account (5€ a month, totally worth it)
- OpenWrt compatible Router flashed with latest OpenWrt Firmware
- Basic Networking and Linux skills
For this tutorial I used a Netis NX31 WiFi 6 Router and followed the OpenWrt Installation and Mullvad’s Wireguard Configuration guides as base.
Install WireGuard Packages
Plug in your Internet connection at the WAN port and your Computer at the LAN port of the Router.
Login to your OpenWrt Router under the IP http://192.168.1.1. Set an Admin password, activate HTTPS, Language, Date and Time.
Change your default IP Range from 192.168.1.0/24 to something you prefer and don’t forget to enable your WiFi radio.
Under System → Software click on Update lists.... Search under Filter for luci-proto-wireguard. Click on Install... → Install.

If you prefer to do the WireGuard installation via SSH:
1
2
3
opkg update
opkg install luci-proto-wireguard # this should download all the dependencies
reboot # reboot after installation
This should install all dependencies like kmod-wireguard and wireguard-tools. After a reboot, you should see WireGuard under Status menu.
Mullvad VPN
Prepare your Mullvad VPN WireGuard configuration files by logging in with your 16-digit account number.
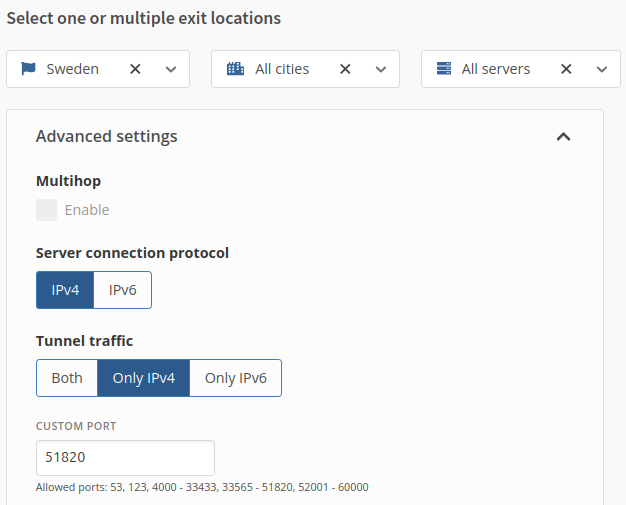
On the left side under Downloads → WireGuard configuration choose Linux and click on Generate key.
Sense privacy is very important for me, I only choose Sweden as country with All Cities and All Servers. Select IPv4 as Server connection protocol and Only IPv4 as Tunnel traffic.
If you have difficulties with the connection, it could be possible that your ISP blocks WireGuards default port 51820.
It happened a couple of times to me, but the issue was solved as soon I changed from the default port to an arbitrary number that Mullvad allows.
Mullvad can block Ads, Trackers, Malware, Adult content, Gambling and Social Media based on DNS.
But be aware that also legit websites could be blocked. I sometimes had difficulties with AliBaba, AliExpress and some other Chinese websites.
When you are happy with your configuration click on Download zip archive.
The zip file contains around 40 WireGuard configuration files if you selected Sweden as country with all servers.
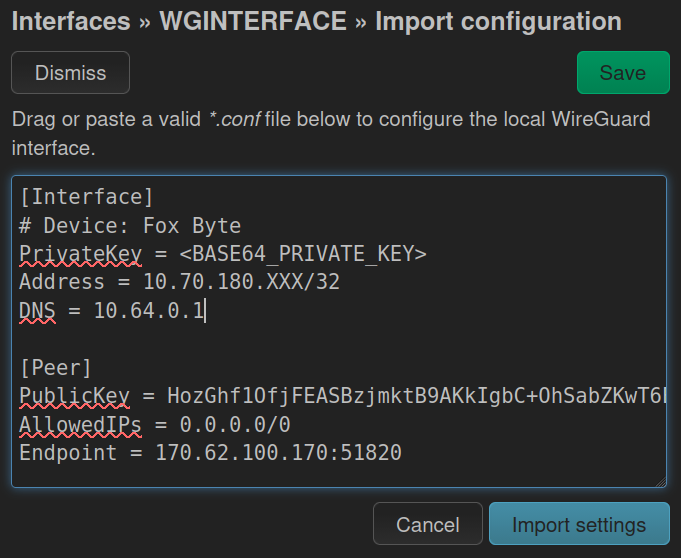
The content of a WireGuard config file should look something like this:
1
2
3
4
5
6
7
8
9
10
[Interface]
# Device: Fox Byte
PrivateKey = <BASE64_PRIVATE_KEY>
Address = 10.70.180.XXX/32
DNS = 100.64.0.63 # or 10.64.0.1 for no 'Content Blocking'

[Peer]
PublicKey = HozGhf1OfjFEASBzjmktB9AKkIgbC+OhSabZKwT6EHc=
AllowedIPs = 0.0.0.0/0
Endpoint = 170.62.100.170:51820
Create WireGuard Interface and Peer
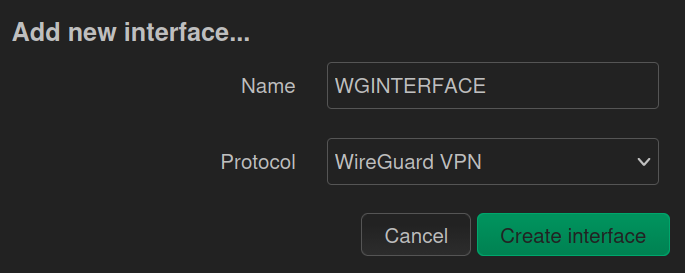
Under Network → Interface click on Add new interface at the bottom of the page. Select as Name WGINTERFACE and Protocol Wireguard VPN.
After creating WGINTERFACE, insert the Private Key and IP Addresses from the config file, Public Key from the Mullvad’s Configure page.
Under the tab Peers → Add peer, insert the Public Key of Mullvad Server, set Endpoint Host to the IP of the Mullvad Server, Endpoint Port to 51820, Allowed IPs to 0.0.0.0/0, tick the Route Allowed IPs checkbox, and set Persistent Keep Alive to 25.
Change to the Advanced Settings tab and check Force link and then Save and Apply.
A much easier approach in newer OpenWrt versions, is to import or copy-and-paste the config under Import Configuration → Load Configuration.
Copy the content of your Wireguard config file and click on Import settings. Make sure that all the details above are set accordingly and Save and Apply.
If you import or copy-and-paste the config, don’t forget to set
Persistent Keep Aliveto 25 and checkRoute Allowed IPsmanually.
Firewall and Routing
Add a new firewall rule under Network → Firewall.
Name the zone WGZONE, set Input to reject, Output to accept and Forward to reject.
Check Masquerading and MSS clamping.
Select WGINTERFACE under Covered networks.
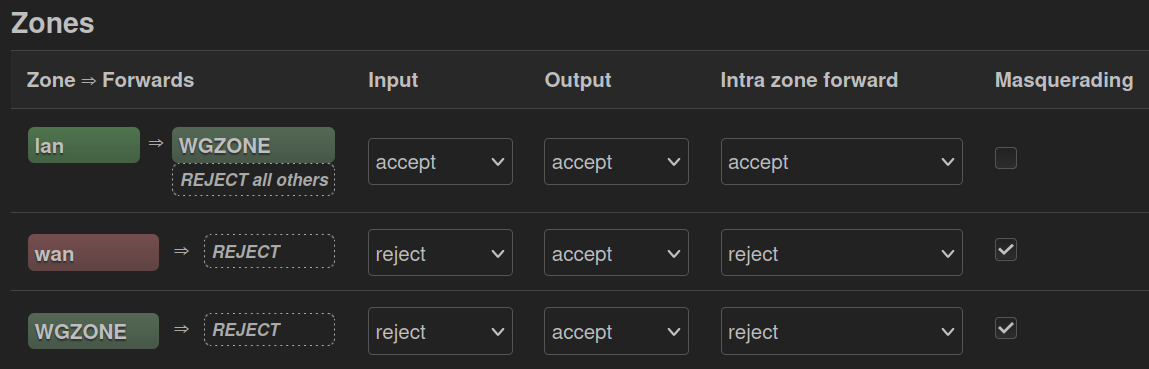
Edit the lan Zone and set Allow forward to destination zones to WGZONE (WGINTERFACE) as the only allowed option. Finally Save and Apply.
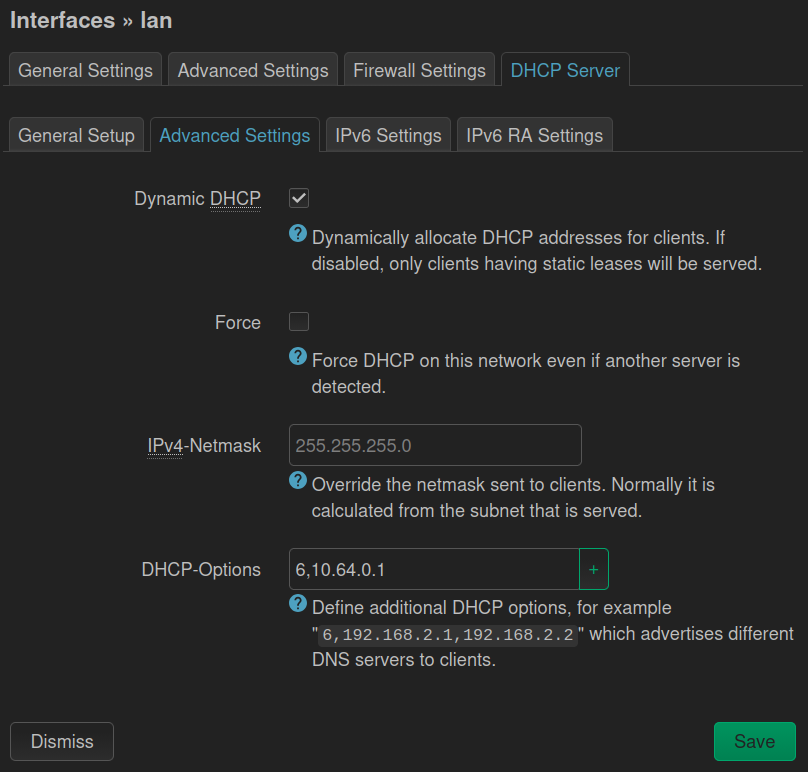
DHCP and DNS settings
Under Network → DHCP and DNS change the tab to Forwards and set DNS forwards to 10.64.0.1 (or 100.64.0.7 if you want to use Content Blocking DNS).
Under Network → Interfaces edit the lan interface.
Change the tab to DHCP Server → Advanced Settings and set DHCP-Options to 6,10.64.0.1. Save and Apply.
Connection Check
If everything worked out fine, you should see some activity under Status → WireGuard.
You can also visit Mullvad’s Connection Check and see if there is any DNS or WebRTC leaks.
1
2
3
4
5
6
7
8
9
10
11
12
13
14
15
# check if Mullvad DNS is reachable
ping -I WGINTERFACE 10.64.0.1

# check if internet works
ping -I WGINTERFACE 1.1.1.1

# opkg update && opkg install curl

# check if wireguard interface connects to Mullvad
curl --interface WGINTERFACE https://am.i.mullvad.net/connected
You are connected to Mullvad (server se-sto-wg-206). Your IP address is 170.62.100.XXX

# check if all traffic is tunneled through Mullvad
curl https://am.i.mullvad.net/connected
You are connected to Mullvad (server se-sto-wg-206). Your IP address is 170.62.100.XXX
Don’t forget to make a backup of your OpenWrt settings under System → Backup / Flash Firmware. Click on Generate archive and download it on your Computer.
Have fun and enjoy your privacy.
In the upcoming posts we will dig deeper into the WireGuard rabbit hole and write some advanced BASH scripts for OpenWrt and perhaps we will setup a Linux Server that tunnels all our traffic to different VPN Providers.
Stay tuned.